As an Amazon Associate, we earn from qualifying purchases. Some links on this site are affiliate links at no extra cost to you. Our recommendations are based on thorough research and editorial judgment.

Creating Clean Garden Borders: A Complete Edging Guide
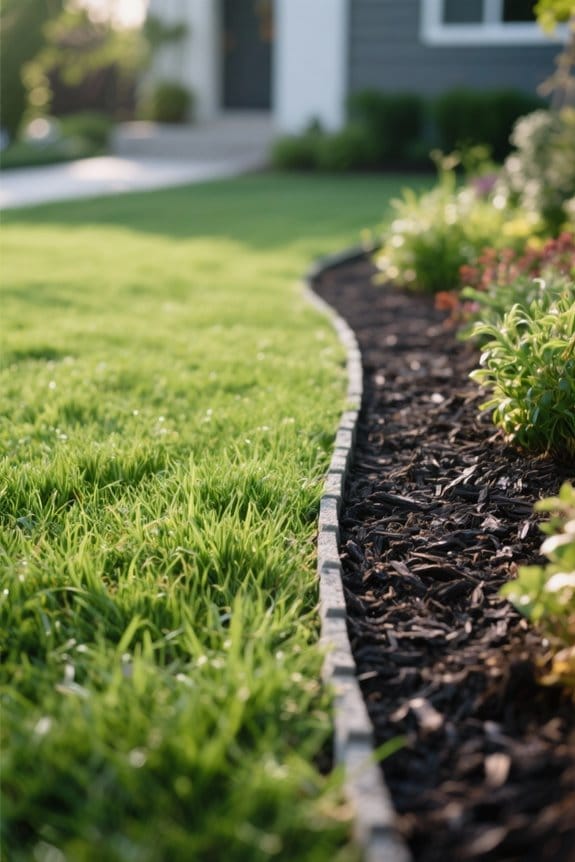
A clean garden border defines beds, stops grass and mulch, and eases maintenance. Start by outlining beds with a hose or string, mark dimensions, then cut a trenched edge about 3 inches deep and a 45-degree inner bevel for a crisp line. Choose stone, steel, recycled plastic, or concrete based on budget and frost depth, anchor metal with spikes every 12–18 inches, or set stones on compacted sand. Follow seasonal upkeep for lasting results, and the full guide shows how to proceed.
Key Takeaways
- Plan and mark bed lines with a hose or string, measuring widths (3–6 ft) and adding gentle curves for a natural look.
- Choose edging material (stone, metal, plastic, wood, or concrete) based on durability, style, budget, and local climate.
- Cut a trenched edge with a flat shovel—about 3 inches deep plus a 45° inner cut—for a crisp lawn-to-bed separation.
- Install edging in a 2–3 inch trench, anchoring metal with spikes every 12–18 inches and setting stone on a firm base.
- Maintain edges annually: trim grass, replace damaged pieces, mulch beds, and adjust borders as plants grow.
What Garden Edging Does and Why It Matters
You may be interested


A neat strip of metal, plastic, or stone can mark where lawn ends and bed begins. Edging defines garden boundaries and prevents grass and weeds from invading flower beds. It creates clean lines, improving curb appeal and making beds visually appealing to passersby and buyers. Proper edging also stops mulch and soil spillage onto paths, reducing weekly maintenance to simple trimming and sweeping. Installed at 2–4 inches deep, edging forms a root barrier that limits turfgrass spread and competition for nutrients. Natural stone or manufactured materials come to the rescue depending on style, but correct placement and depth matter more than choice. By limiting erosion and nutrient loss, edging contributes directly to soil health and long-term plant vigor. The durability of edging materials like stainless steel ensures long-lasting performance across various conditions, enhancing the overall effectiveness of garden borders.
Choosing the Right Edging Material for Your Yard

Three practical factors determine the best edging material for any yard: durability, appearance, and budget. Choose stone when permanence and low maintenance requirements matter; natural stone slabs 4–6 inches thick resist frost and need little upkeep. Consider plastic or metal edging for straight lines; 4–6 inch high galvanized steel works well for clean turf edges, while flexible aluminum or rubber come to the rescue for curved garden beds. Assess budget constraints: recycled plastic costs less, steel or natural stone costs more but lasts decades. Match material to local climate and soil; wet clay may shift lightweight options, frozen ground favors deeper anchoring to 6–8 inches. For more information on edger materials, consider durable options like manganese steel for rust resistance and longevity. Think creative designs but plan for installation time, tools, and long-term maintenance.
Recommended Products

Easy installation – Install garden edging border quickly with our patent-pending connection system. Simply hammer spikes to secure for a stable it firmly in place. Ideal for landscape edging border projects.

Do it once, do it Right! Edge Right is the ultimate hammer-in edging. Instead of cheap plastics it's comprised of heavy duty 16-gauge COR-TEN steel.

STAYS IN PLACE - Our edging stays securely in place, keeping mulch and other materials from migrating into other areas of your landscape for a pollished look
How to Plan and Mark Bed Lines

Garden hose arcs and string lines help lay out the bed before any soil is moved. Use a garden hose to create curves, or run string between stakes for straight lines, to outline the garden bed precisely. Measure length and width with a tape; common beds are 3–6 feet wide for reachability. Marking the perimeter with spray paint, flags, or small stakes makes the intended outline clear for everyone. Incorporate gentle curves of 1–3 foot radii to create a natural look, visually appealing and easier to mow around. Adjust lines as needed while standing back and visualizing. Confirm dimensions, then record them. These steps set a reliable guide for digging and edging, preventing rework and ensuring a clean, consistent border. Consider using manual half-moon edgers for precision and control when working with smaller garden areas.
Step-by-Step: Cutting a Trenched Edge

Once the bed line is marked, the work moves to cutting a trenched edge along that outline. Use a flat shovel to dig straight down about 3 inches, creating a clean cut separating lawn and flower bed. Make a second slice at a 45-degree angle toward the flower bed, this forms a smooth trench and prevents grass and plants from encroaching. Remove excess soil to establish a clear trench along the border, and transfer soil to another area or fill low spots. Add 1–2 inches of mulch to cover the slope and achieve a finished look without installing edging materials immediately. Re-dig the edge annually as maintenance, this keeps the trench defined and lets lawn edging or natural stones come to the rescue when desired. Using quality stainless steel shears can help with precise trimming and maintaining clean garden borders.
Recommended Products

H322 Fruit Shears with Strap are designed for harvesting citrus and soft fruits with minimal damage, featuring stainless steel blades and a convenient wrist strap.
TITANIUM BLADE: This is a heavy, high quality pruning shear you’ll be proud to own or gift. These garden pruners are a classic design and come with a titanium blade for extra sharp cuts and extended durability.

Installing Strip, Metal, and Stone Edging

Begin by choosing the right edging material for the bed shape and durability needs. Installing strip edging uses flexible vinyl or metal that follows curves or straight lines, providing a neat appearance and easy shaping. Dig a trench 2–3 inches deep to seat the strip, tamp soil for stabilizing, and backfill to prevent sinking. Metal edging, such as steel or aluminum, creates a durable boundary resistant to weather, and offers a clean modern look; anchor with spikes every 12–18 inches for rigidity. Stone edging provides robust, attractive protection from lawn equipment, but demands careful placement and a firm trench base for stabilizing each unit. Regular maintenance, including clearing debris and adjusting shifts, keeps garden borders tidy and functional. For those using cordless lawn edgers, battery life considerations become crucial during extended use, ensuring that the edger remains efficient throughout the project.
Recommended Products

KIT INCLUDES: Each kit includes 10 Black Anodized 8ft strips, 30 stakes, and 4 end stake adapters; Each strip measures 3/16in x 5.5in x 8ft; 80 linear feet of landscape edging per box

KIT INCLUDES: Each kit includes 15 Mill Finish (Natural Aluminum) 8ft strips, 45 stakes, and 4 end stake adapters; Each strip measures 1/8in x 5.5in x 8ft; 120 linear feet of landscape edging per box

Low-Cost and Creative Edging Ideas
After installing permanent strip, metal, or stone edging, lower-cost options can come to the rescue for filling gaps or outfitting informal beds. Use logs cut 2–4 inches high as natural edging; place ends tightly, stagger joints every 6–12 inches for stability. Create a V-cut with a flat shovel, 2–4 inches deep, to define a clean line without bought materials. Plant low-growing perennials or ground cover, spaced 6–12 inches apart, to act as living edging and slow plant growth over the soil edge. Recycled materials like rubber, plastic, or glass can form low-cost, durable garden edging; install to 2–3 inches below grade for a neat line. Paint rocks or repurpose wood scraps for creative, visually appealing borders. For effective weeding in tight spaces, consider using ergonomic handle designs that enhance comfort and reduce hand fatigue.
Seasonal Maintenance and Edge Repair
A yearly check of the garden edge keeps beds neat and prevents grass from reclaiming borders. Seasonal maintenance requires annual re-digging of a 2–4 inch trench, removing encroaching plant growth and roots to restore clean lines. Inspect edges after heavy rain for soil settling and erosion, then compact with a tamper if the trench depth changes more than 1 inch. Use tools such as a flat-edged shovel or half-moon edger for precise cuts, 6–12 inch blade widths work well. During the growing season clear debris and dirt weekly to avoid buildup. Reassess mulch and other border materials each season, adding a 2–3 inch layer of mulch as needed. Perform small edge repair promptly to maintain defined garden edges. Consider using heavy-duty adhesive tapes to secure garden borders against shifting, especially during adverse weather conditions.
Planting and Design Tips for Beautiful Borders
When planning border plantings, first match species to the sunlight exposure at the site. Choose plants for full sun, partial shade, or shade accordingly, noting mature height and spread to prevent overcrowding. Measure beds 18–36 inches wide for small borders, 48–72 inches for mixed plantings, and allow 12–24 inches between perennials. Combine heights, colors, and textures to add visual interest, using tall back layers and low front edges. Select low-water, easy to maintain varieties like sedums, ornamental grasses, and native shrubs. Prepare types of soil by testing pH and amending with compost to improve drainage and nutrients. Install landscape edging with 4–6 inch-deep metal or plastic, the right materials to separate lawn from garden bed, then mulch to retain moisture. Consider using ergonomic designs for garden tools to reduce strain during planting and maintenance tasks.
Frequently Asked Questions
What Are Common Mistakes When Edging?
Catastrophic chaos ensues when common mistakes include poor execution, choosing materials unsuited to style, improper depth, neglecting curves, ignoring maintenance, incorrect spacing, inadequate tools, hasty decisions, and overlooking drainage — resulting in messy, unmanageable borders.
What Do Professionals Use for Landscape Edging?
Professionals use varied landscape edging materials: metal, stone, concrete, composite, plastic—chosen with professional edging tools and edging installation techniques. They balance cost effective edging, durable edging options, eco friendly edging solutions, decorative landscape borders, custom edging styles, edging design ideas.
How to Create a Beautiful Garden Border?
Like a painter’s first stroke, one creates a beautiful garden border by choosing garden style and border materials, combining plant selection and color contrast, embracing seasonal changes, using DIY edging and natural elements, and following maintenance tips for lasting aesthetic appeal.
Is It Better to Edge a Lawn When Wet or Dry?
Dry conditions are preferable; lawn conditions allow cleaner cuts with edging tools, minimizing moisture effects, soil compaction and root damage. Timing after slight drainage balances grass health, seasonal timing, edge maintenance and overall lawn aesthetics.