As an Amazon Associate, we earn from qualifying purchases. Some links on this site are affiliate links at no extra cost to you. Our recommendations are based on thorough research and editorial judgment.

Maintaining Edges Around Trees and Landscape Features
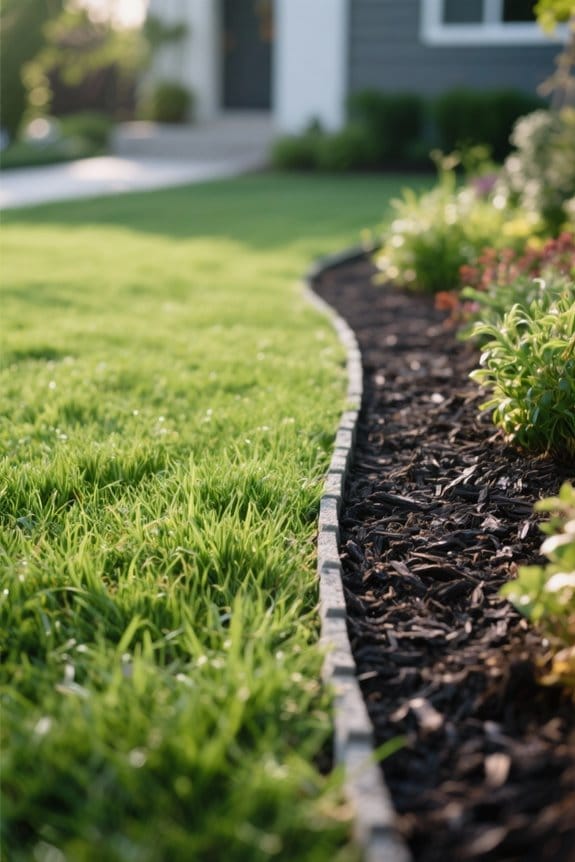
Clear edges protect tree roots and simplify lawn care. Cut a 3–10 ft mulch ring around trees, keeping mulch 2–4 in deep to conserve moisture, and use a 3–4 in trench for spade-cut edges. Install permanent edging like 0.08–0.12 in aluminum, 2–4 in stone, or treated timber for durability. Use a sharp spade, edging tool, and rake, re-cut every 6–12 months, and manage slope/drainage by 1–2% to prevent pooling. More practical tips follow.
Key Takeaways
- Define and maintain a clear mulch ring 3–4 feet from tree trunks to prevent grass encroachment and root damage.
- Use a sharp spade or edging tool to recut edges annually, keeping 3–4 inch trench depth for a crisp barrier.
- Apply 2–4 inches of organic mulch and refresh yearly to retain moisture and reduce watering needs.
- Choose durable edging (metal, stone, or treated wood) and set it properly to resist soil movement and mowing damage.
- Grade for 1–2% slope and install perforated drains where water pools to protect roots and prevent edge failure.
Why Proper Edging Matters for Trees and Landscape Features
You may be interested


When homeowners establish a clear edge around a tree, they create a deliberate buffer that limits grass encroachment and reduces competition for water and nutrients. Proper edging defines tree roots zones, typically a 3–4 foot radius for small trees and 6–10 feet for larger specimens, creating space for a 2–4 inch mulch layer. This mulch insulates roots and retains moisture, reducing watering frequency by up to 30 percent. A distinct border also separates landscape features, improving aesthetic appeal and simplifying lawn care tasks like mowing and trimming. Routine maintenance includes re-cutting edges every 6–12 months and replenishing mulch annually. These practices prevent soil erosion, protect root health, and reduce long-term restoration costs, offering practical, measurable benefits. For those looking for a professional finish, selecting a durable step edger with adjustable handle lengths and high-quality blades is essential for maintaining clean and precise borders.
Choosing the Right Edging Material for Your Yard

Having established clear edging around trees and planted areas, attention now turns to selecting the material that will hold that shape long-term. Wood edging, such as cedar or redwood, offers a natural look and costs less, but expect periodic replacement every 3–7 years depending on rot and exposure. Metal edging, often aluminum, provides a slim profile 4–6 inches high, resists rust, and suits modern beds while remaining customizable. Plastic edging, like flexible recycled polymer, comes in 3–4 inch sections, resists decay, and is easy to install for curved beds. Stone or brick delivers durability and rustic appeal, with pavers set on a 2–3 inch sand bed. Choosing the right option balances aesthetics, maintenance, and practical purposes for long-term landscape edging. Lawn edgers play a crucial role in maintaining clean edges, ensuring that the chosen edging material is complemented by well-defined borders.
Tools You Need for Clean, Durable Edges

A few reliable tools make clean, durable edges much easier to achieve. A sharp spade cuts turf cleanly, its 8–10 inch blade creating a defined edge in one stroke. A landscape edging tool comes next, often 18–24 inches long, that creates uniform profiles and reduces repeated trimming. A garden rake levels soil and firms backfill within a shallow trench about 2–4 inches deep, keeping mulch and compost settled. A trenching shovel or half-moon edger can make vertical cuts to separate grass from beds and protect tree roots from accidental damage. Mulch applied 2–3 inches thick helps suppress weeds and retain moisture. Regular maintenance, such as seasonal re-cutting and tool sharpening, preserves edge definition and overall landscape design. To maintain the peak performance of your tools, it’s essential to regularly clean them after use to prevent residue buildup.
Step-by-Step Spade-Cut Edging for Garden Beds
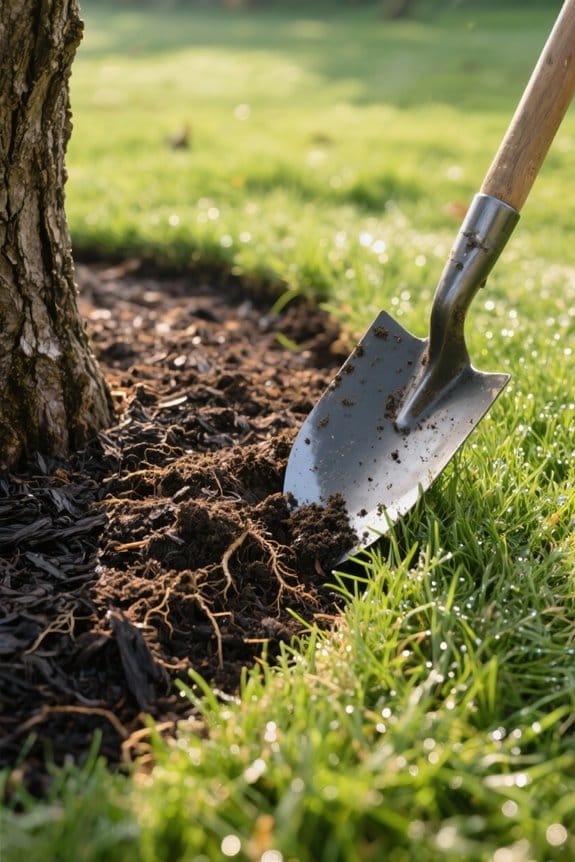
One clear outline helps guarantee a crisp spade-cut edge before digging begins. A hose or string marks the desired line for spade-cut edging, providing a visual guide. Use a spade to dig a trench about 3–4 inches deep along the marked line, angling the blade slightly away from the bed to form a defined edge. Remove grass clods from the trench, lifting turf pieces so grass cannot creep into garden beds. Keep trench edges straight or smoothly curving, checking consistency around trees and other landscape features. Firm the soil back against the bed to maintain shape. Periodic re-digging comes to the rescue, preserving the cut and preventing overgrowth. Repeat maintenance every few weeks during active growth seasons. Using high-quality SK5 steel in gardening tools can ensure longevity and precision in maintaining these edges.
Installing Permanent Edging: Metal, Stone, and Timber Options
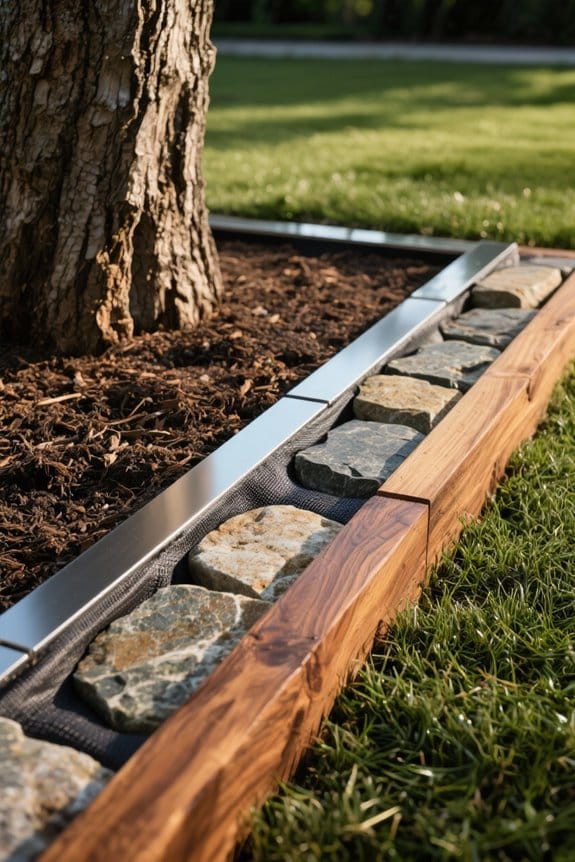
When choosing permanent edging, consider material, height, and anchoring before digging. Metal edging, often 4–6 inches high made from aluminum or galvanized steel, provides durable, precise curves and straight lines in landscape designs. Stone edging can be set 2–8 inches into the ground, using pavers or natural rock to stabilize soil and help mulch stays where desired, enhancing visual appeal. Timber options like untreated cedar or redwood, typically 4–6 inches tall, add rustic charm and flex for curved beds, but require occasional maintenance to avoid rot. Install all edging with stakes or concrete anchors to prevent shifting and grass encroachment. Assess soil conditions and climate; rocky, wet, or freeze‑thaw soils may need deeper footings or corrosion‑resistant choices. Rust-resistant materials ensure multi-season tool longevity, making them a wise choice for permanent installations in varied climates.
How to Edge and Mulch Around Trees Without Damaging Roots
After installing permanent edging, attention turns to protecting tree roots while creating a neat mulched bed. Remove grass in a three-foot diameter, using hand tools to avoid damaging tree roots, and set a clean edge where edging around trees meets soil. Do not force tools into hard ground; prune small roots only when necessary, and backfill gently. Spread mulch around the tree to a depth of 2-4 inches, extending to the drip line but keeping mulch pulled away from the trunk to prevent moisture retention against bark. Mulch helps insulate soil, reduce compaction, and minimize mower damage. Regular inspection and topping up preserve the clean edge and promote healthy growth, making maintenance predictable and effective. Selecting tools is crucial for creating defined garden edges, with a focus on durability and comfort features to ensure neat and tidy landscapes.
Seasonal Maintenance and Re‑defining Edges
Re-cut the trench around trees and landscape features at least once a year to keep grass from creeping over the edge. Seasonal maintenance prevents root competition and preserves a clean, natural aesthetic around each tree, while also protecting drainage. Inspect edges after storms and during spring clean-up, monitoring soil and edging materials for collapse or displacement. Remove invading grass and weeds by hand or with a narrow tool, maintaining a 2–4 inch mulch layer, kept several inches away from the trunk to avoid rot. Re-define edges if mulch or soil has built up, using a half-moon shovel or an edging iron, creating a 2–3 inch deep trench for clear separation. Prompt repairs extend effectiveness and reduce long-term labor. To ensure the longevity of your work, consider using high-quality leak repair tapes to maintain the integrity of any irrigation systems around the landscape.
Common Edging Mistakes and How to Avoid Them
How should a homeowner avoid common edging mistakes that make beds look sloppy or fail quickly? Measure and outline the edge first, using spray paint or string to verify consistent curves and 3–6 inch trench depth for most borders. Prepare soil with compost and a 2–3 inch weed barrier, as proper soil preparation deters grass intrusion and stabilizes edging. Schedule periodic maintenance every 6–12 months, re-digging a shallow trench and resetting stones or plastic. Choose durable edging options like 4–6 mm steel, stone, or treated wood to prevent inadequate materials and aesthetic inconsistency. Factor in drainage considerations, slope grading of 1–2% and perforated drainpipe where water pools. Follow these steps to avoid failure and prolong edge life. Additionally, homeowners can enhance the effectiveness of their landscape lighting by using grow lights with full spectrum capabilities to mimic natural sunlight, promoting healthier plant growth.
Design Tips: Using Edging to Enhance Garden Flow and Function
When edging is planned with intention, curved lines can guide movement and unite separate garden areas. Use gentle curves of 18–36 inch radius to mimic natural flows in garden beds, connecting paths and landscape features. Select materials like 0.08–0.12 inch aluminum strip or 2–4 inch thick stone to hold shape and resist frost heave. Create maintenance strips around trees of 3–4 feet radius to simplify mowing and trimming, they come to the rescue during seasonal care. Vary plant heights and textures inside beds to promote cohesion, using 6–24 inch perennials and 2–6 foot shrubs for layered effect. Recut edges annually and refresh 2–3 inches of mulch to prevent grass encroachment and maintain crisp lines. Consider using a straight shaft design for better reach and maneuverability when edging around landscape features, which enhances user comfort and effectiveness.
Frequently Asked Questions
Should You Put Edging Around Trees?
Yes. He notes tree edging benefits for weed control, mulch maintenance, root protection and aesthetic appeal, supporting flowerbed integration and cohesive landscape design while preventing grass encroachment and simplifying routine care.
What Is the Best Low Maintenance Landscape Edging?
The best low maintenance landscape edging is often metal strips or concrete curbing; alternatives include natural stone or stone borders, plastic edging, rubber pavers, or wood chips, chosen for durability, flexibility, and minimal upkeep.
What Are Common Flowerbed Edging Mistakes?
Common mistakes include ignoring flowerbed depth and plant roots, choosing inappropriate edging materials that clash with landscape design, poor weed control and soil erosion planning, and skipping maintenance tips, causing long-term repair and aesthetic issues.
How to Properly Edge Around a Tree?
Absolutely gigantic effort stamps out messy borders: one trims a 3-foot sod ring, uses tree edging techniques and edging tool recommendations, selects edging material options, applies mulch depth considerations, protects roots with root protection methods, balances aesthetic design choices, and follows maintenance frequency tips.