As an Amazon Associate, we earn from qualifying purchases. Some links on this site are affiliate links at no extra cost to you. Our recommendations are based on thorough research and editorial judgment.

Installation Points and Angles: Planning Your Shade Sail Layout
A proper layout starts with strong anchor points like trees, walls, or purpose-built posts. Measure sun angles and set corners so the lowest point is at least 15% below the highest, typically a 3–4 ft drop over a 10–15 ft span for drainage. Use 4-inch Schedule 40 steel or 6×6 treated posts with concrete footings, heavy-duty pad eyes, turnbuckles and snap hooks rated for ~150 lb tension per corner. Further steps explain tensioning and overlap options.
Key Takeaways
- Map sun paths and peak sun hours to position the sail for maximum midday shade and minimal glare.
- Choose sturdy anchor points (walls, trees, or purpose-built posts) rated for ~150 lb tension per corner.
- Plan a minimum 3 ft height difference between corners, with at least one corner 15–25% lower for drainage.
- Use a four-corner Hypar shape where possible for predictable tension, reduced flapping, and consistent water runoff.
- Size posts and footings so exposed length plus footing depth resists loads; confirm hardware (turnbuckles, pad eyes) ratings.
Choosing the Best Location for Your Shade Sail
You may be interested


When should one place a shade sail to get the most useful coverage? The planner assesses sun direction and patterns to locate peak midday shade, typically aimed at summer sun angles. Choose a site offering at least a 3ft height difference between corners for better appearance and drainage. One corner should have a minimum 25% tilt to avoid water pooling when it rains. Select sturdy Anchor Point options like trees, walls, or purpose-built poles able to bear sail tension loads. Confirm local building codes and HOA rules before installation to verify compliance with height and permit requirements. Consider fabric orientation for UV protection, aligning the Shade Sail to block strongest rays while preserving airflow and sightlines. For those looking to maintain a professional-looking lawn, using a durable lawn edger can help create clean borders that enhance the overall aesthetic of your outdoor space.
Assessing Anchor Points and Structural Strength
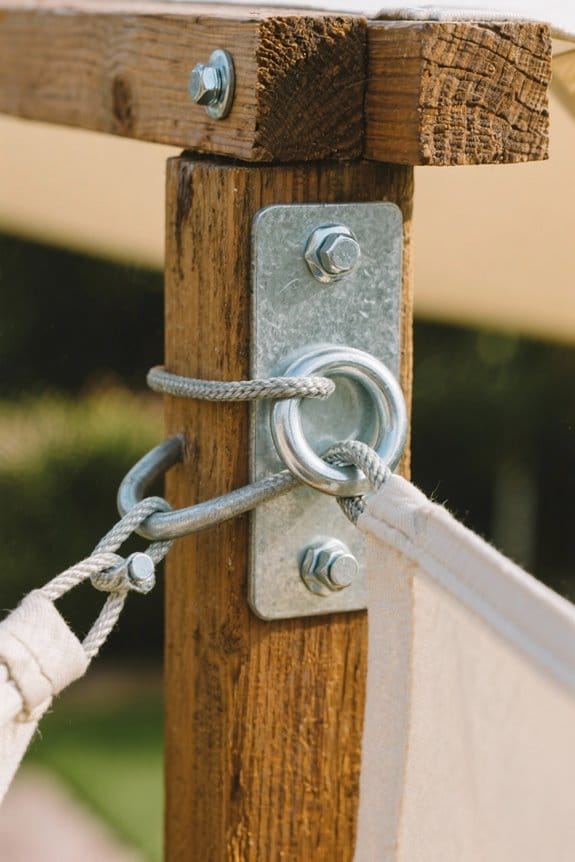
Evaluating anchor points begins with verifying their ability to resist the roughly 150 pounds of tension each sail corner may impose, a load that increases under wind and dynamic movement. Inspect existing structures like walls and trees for visible damage, rot, or loose masonry, and assess whether they meet required tensile capacity before committing. Use dedicated supports when needed; 4-inch Schedule 40 steel pipe or 6×6 treated wood posts are standard, offering predictable structural strength and easier anchoring. Ascertain one corner sits lower, creating a 15–25% tilt to shed water and prevent pooling. Confirm compliance with local height and utility regulations to avoid hazards. Test points with downward pressure and dynamic load simulation to validate long-term performance. Consider installing energy-efficient LEDs to enhance outdoor lighting while minimizing electricity consumption.
Recommended Products
Package quantity: 1
03-07 SILVERADO 2500HD/3500 LEGEND FRONT BUMPER

Ranch Hands Legend Front Bumper Provides Maximum Protection
Determining Sail Shape, Size, and Overlap Options

With anchor locations and structural capacity confirmed, attention shifts to choosing sail shapes and sizes that work with those points. A four-corner Hypar is recommended for initial layouts, offering predictable tension and minimal flapping. Three-sided sails are discouraged; they provide less shade and flap more, increasing wear. Measure the area to be shaded, then size Shade Sails so fixing points can resist calculated tension forces, typically several hundred kilograms at peak loads. Custom sails come to the rescue for irregular spaces, permitting planned overlaps and unique placements. Maintain at least a 3-foot height difference between overlapping sails to add visual interest and reduce fabric contact. Place each sail corner and fixing points to distribute load evenly and allow straightforward future adjustments. Consider using durable construction materials for shade sail poles to ensure longevity and stability, especially in outdoor settings.
Calculating Heights, Angles, and Drainage Pitch

Although careful planning starts with the location of fixings, precise height and angle calculations are what guarantee proper drainage and stability. Designers recommend calculating heights with a minimum three-foot difference between corners to add visual interest and improve runoff. One corner should be at least 15% higher to help rainwater flow away and avoid pooling. Aim for an overall drainage pitch near 25% from the highest to the lowest point, which facilitates reliable runoff during storms. Account for sail height plus footing depth when sizing posts so they resist loads and tension the fabric correctly. Proper angling also lowers wind resistance and increases stability in gusty conditions. Simple measurements and consistent slopes come to the rescue when preventing water and wind problems. When selecting a shade sail, it’s important to consider options that block up to 98% of UV rays for enhanced protection while maintaining stability and durability against weather conditions.
Recommended Products

Wind-Resistant Protection: Pro-Tect tested and proven to withstand up to 100 mph winds (product must be anchored as specified in the Backyard Discovery instruction manual)

Simple Installation: Experience quick and simple installation with our straightforward 4-step process. Designed for user convenience, the lightweight construction at 32 lbs enables easy setup by a single person. Please see the user's manual and instructional video guide for detailed guidance if needed.

【Easy Installation】: 4-step installation in 15 minutes with threaded connection design for easy pole assembly, lightweight for single-person setup. Please refer to user’s manual and video guide.
Selecting Posts, Footings, and Mounting Hardware

Three solid options exist for posts: 4-inch schedule 40 steel pipe, 6×6 treated wood, or a reinforced concrete column. Posts must resist about 150 pounds of pull per corner, so choose materials and embedment accordingly. Footings should extend at least half the exposed post length below grade, typically 2–3 feet for standard 4–6 foot posts, with concrete shaped to slope away from the posts for drainage. Use high-quality mounting hardware like snap hooks, turnbuckles, and pad eyes to secure the sail, allow adjustment, and reduce wear on attachment points. Verify existing anchors, such as walls or trees, can handle the load. Check local building codes for post height, footing depth, and required permits before installation. When planning your layout, consider the versatile use cases of the shade sail to ensure it meets your shading needs across different outdoor locations.
Recommended Products

Easy Assembly: Setting up is a breeze with our straightforward 4-step process. The lightweight design allows for easy handling by one person. For detailed instructions, please consult the user manual and accompanying video

Package Include: 1 base plate; 1 reinforced base frame;1 pcs 12FT cables; 4 drilling bolts; 4 securing nuts; 1 pcs 8 ft pole sections, 1 capped 4ft pole section, total length: 12 ft; D-Ring clamp system, and 1 clamp tightening bolt and nut
【Simple Installation】: Experience quick and simple installation with our straightforward 4-step process. Designed for user convenience, the lightweight construction at 32 lbs enables easy setup by a single person. Please see the user's manual and instructional video guide for detailed guidance if needed.
Tensioning Technique and Final Corner Strategies
After posts and hardware are set, attention turns to applying the correct tension to the sail corners. One corner is anchored first, secured tightly to a heavy duty fitting to create a stable reference point, then a ratchet strap applies roughly 150 pounds of initial force to shape the fabric. Next, adjacent corners are stretched and secured, maintaining even pull to prevent distortion, using a winch or helper if needed to reach attachment points. Final corner requires the most effort; stretch it as close to the mount as possible, then swap the ratchet for a turnbuckle for precise fine-tuning. Inspect seams and fittings, re-tension periodically to compensate for fabric creep, and replace any worn hardware before loss of shape occurs. Consider the UV resistance and durability features of the shade sail materials to ensure they withstand various weather conditions and provide effective sun protection.
Planning for Wind Loads, Sun Movement, and Local Regulations
Start by evaluating local wind conditions and sun paths before selecting a layout. Measure peak wind speeds and gusts to size anchors and determine angles, since vertical installations increase wind loads while flatter, horizontal setups reduce resistance. Conduct a solar study for daily and seasonal sun movement to place the shade sail for maximum coverage, noting required 25% slope for water runoff. Verify local regulations, permits, and utility lines early, especially in Florida and California where codes differ. Specify anchor ratings that match calculated tension forces, typically stainless steel fittings rated above working load limits. Use concrete footings or engineered posts where needed, and document compliance to satisfy inspectors and prevent future issues during maintenance or upgrades.
Frequently Asked Questions
What Angle Should a Shade Sail Be?
A shade sail should be mounted with at least a 15° tilt to promote drainage and effective shade coverage. The installer balances installation considerations, ideal tension, and corner heights to guarantee performance and visual appeal.
How to Position Shade Sail Posts?
Position posts to suit post material options, setting shade sail height with at least 3ft corner difference and 15% tilt. Use secure post foundation methods (concrete footings or ground anchors), oriented for sun, wind, and drainage.
How Far Apart Should Posts Be for Shade Sail?
Like fence posts in a marching line, posts should sit about 8 to 15 feet apart. He notes post spacing recommendations, considers ideal post height for proper shade sail tension, and plans for wind, drainage, and code compliance.
Why Are Shade Sail Posts Angled?
They are angled to promote water runoff and maintain sail tension, improving post stability and preventing pooling. Angling also balances wind loads, optimizes fabric tension distribution, and enhances overall durability while creating aesthetic depth and structural resilience.


